How to Choose the Right Solar Panel Connector: Expert Guide for MC4 Systems
Published by Anish Khatri on 12th May 2025
The right solar panel connector plays a vital role in creating safe and reliable connections for your photovoltaic system. MC4 connectors emerged in 2004 and have revolutionized the industry. They now control 50% of the global market share as of 2022. These connectors can handle tough outdoor conditions and ensure steady power flow from your solar panels.
The positive locking mechanism in MC4 connectors prevents any accidental disconnections from cable pulls. This makes them reliable for installations that need to last many years. The newer versions can handle up to 30 amps and 1,500 volts, which lets you connect more solar panels in series without compromising safety. These connectors work in temperatures from -40°C to +90°C (-40°F to 194°F), so they perform well in different weather conditions.
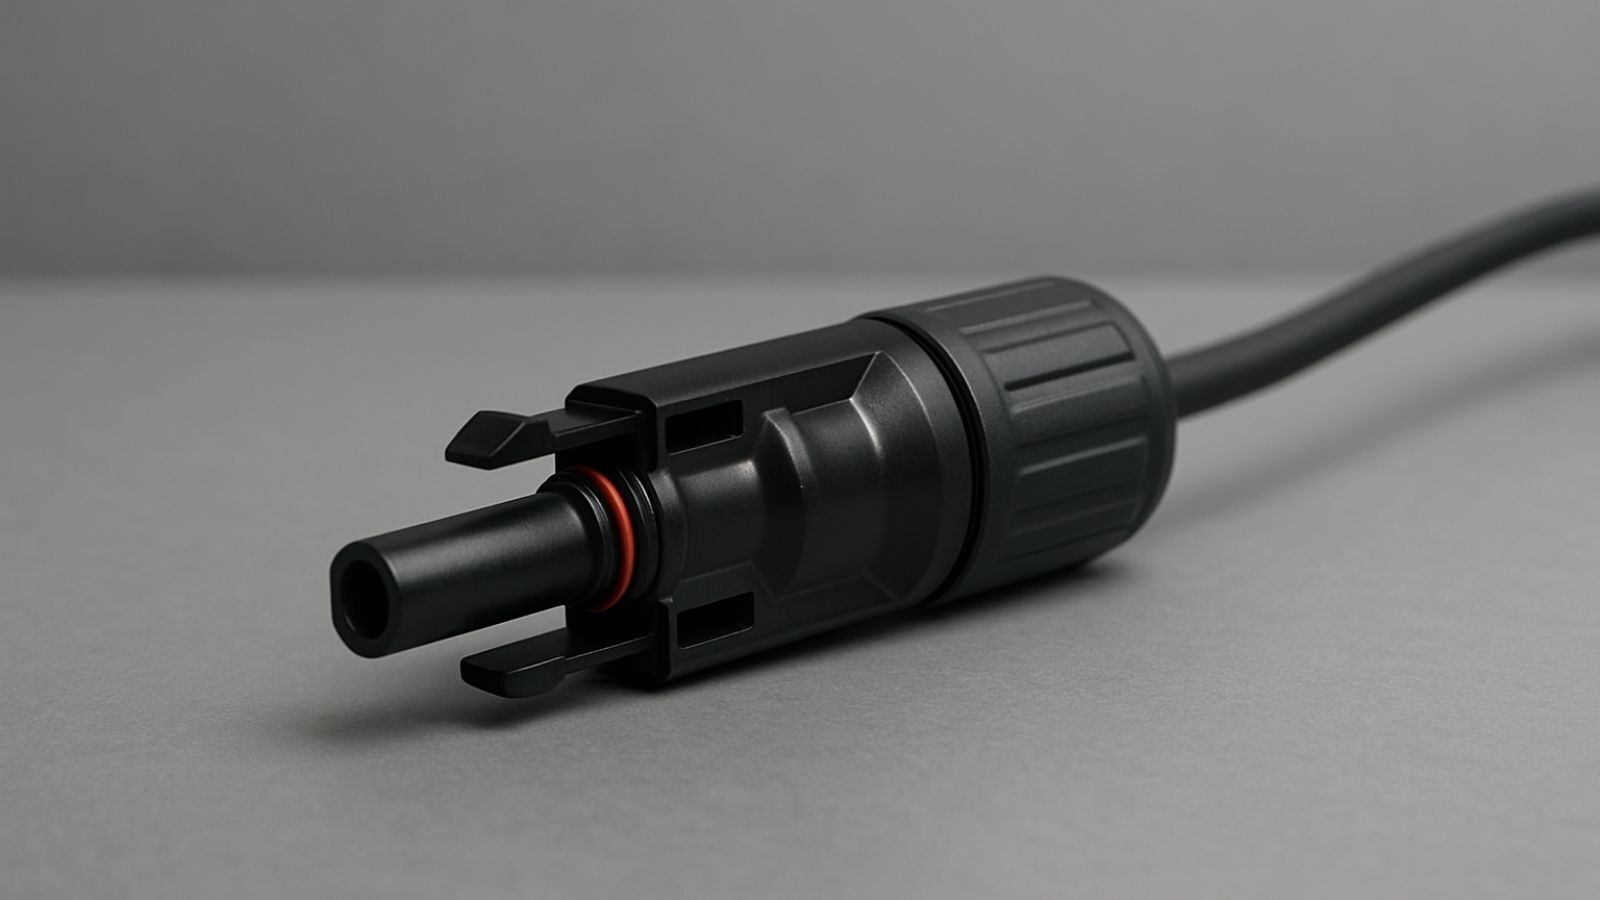
Your MC4 system needs five parts to work properly - an endcap, strain relief collar, seal, housing, and metal connector pins. These components create weatherproof connections that transmit power reliably. The National Electrical Code requires that you use connectors of the same type and brand. This prevents any risks from mixing different connectors. You should know these requirements before picking connectors for your solar setup.
This piece will teach you to spot different MC4 connector types, pick the right ratings, and install these vital components correctly. The advice here will help you make smart choices about your solar panel connections, whether you're building something new or upgrading what you have.
Understanding MC4 Solar Panel Connector Types
MC4 connectors are the foundations of modern solar installations. They account for over 50% of the global market share and appear in more than 800 GW of solar capacity worldwide. Multi-Contact developed these connectors (the "MC" in MC4). They feature a 4mm diameter contact pin (the "4" in MC4) that has become the standard for reliable photovoltaic connections. Knowing the differences between connector types helps you select the right components for your solar power system.
MC4 vs MC4-EVO2: Voltage and Current Ratings
Traditional MC4 connectors and their upgraded MC4-EVO2 counterparts (both manufactured by Stäubli) share the same type classification and work together. All the same, their performance specifications show substantial differences. The MC4-EVO2 handles higher voltage at 1500V DC compared to the standard MC4's 1000V DC rating. The current-carrying capacity changes based on wire size. MC4-EVO2 supports up to 69A with 10mm² cables, while standard MC4 connectors handle up to 45A.
The MC4-EVO2's technical advantages go beyond simple ratings. These connectors feature:
-
Higher surge voltage protection (16kV versus 12kV)
-
Better upper temperature limit (115°C versus 105°C)
-
Improved salt mist spray resistance and ammonia resistance
-
Lower contact resistance (0.2mΩ versus 0.25mΩ)
Both connectors maintain the same safety class (II), degree of protection (IP65 when mated), and make use of the MULTILAM contact system with tin-plated copper contacts.
Identifying Male and Female MC4 Connectors
Solar panels usually come with two MC4 connectors—one male and one female. The difference between these connectors is clear: male connectors have a protruding metal pin, while female connectors contain a metal socket. The female connector typically attaches to the positive lead, though some exceptions exist.
This design stops accidental connections of two positive or two negative wires. Two male or two female ends cannot directly connect without extra equipment like multibranch connectors. MC4 connectors include a snap-in/locking mechanism that prevents accidental disconnection and needs a special tool to separate them. This positive locking system is a major safety improvement over older MC3 connectors that lacked this feature.
Common Solar Panel Connector Types Compared
MC4 leads the market, but several alternative connector types exist:
MC3 Connectors: These MC4 predecessors were discontinued in 2016. They have lower current capacity (up to 30A with 10 AWG cables compared to MC4's higher ratings) and lower voltage ratings (1000V IEC/600V UL versus MC4's capacity for up to 1500V).
T4 Connectors: These work with MC4 connectors and share the same positive locking mechanism and weatherproof design. Amphenol Industrial Solar Technologies makes them with a toolless design for easier installation and disconnection.
Tyco SolarLok: These connectors have a gender-neutral design that lets any two connectors mate without specific male/female components. They were once popular but are now mostly obsolete.
Radox Connectors: HUBER+SUHNER makes these connectors, known for excellent performance in harsh environments and high temperature tolerance.
Your system's connector selection should match both technical specifications and compatibility with existing equipment. The National Electrical Code requires connectors to be of the same type and from the same manufacturer when connected together.
How to Choose the Right Solar Connector for Your System
Solar panel connector selection needs careful attention to technical factors that help your system perform at its best. You can't just pick any connector labeled "MC4 compatible." You need to know how connector specs line up with what your solar array needs. The right choice helps you avoid safety hazards, power losses, and system failures that could cost you a lot in the long run.
Matching Connector Ratings with Panel Output
Your connector ratings should match your solar panel's electrical output exactly to keep things safe and efficient. Check first if your connectors' voltage rating matches or goes beyond what your solar system can generate. To name just one example, standard MC4 connectors work with up to 1000V DC, while MC4-EVO2 models can handle up to 1500V DC for bigger systems. This voltage match prevents insulation breakdown that might cause dangerous arcing.
Current capacity needs your attention too. Your connector should handle the maximum current from your panels with room to spare. MC4 connectors usually work with 22-30 amps, depending on the model and conditions. This is a big deal as it means that going over this limit creates resistance heating that slowly damages the connection.
Keep in mind the environmental factors when picking connectors. Good connectors come with strong weatherproofing and high IP (Ingress Protection) ratings—usually IP65 or better—so they last for years outside. They should also work well across all temperatures your solar setup might face.
Avoiding Cross-Mating: Brand Compatibility Rules
Many people don't realize that connector "compatibility" between different makers can be dangerous. Studies show that failures from mismatched connectors pose the biggest risk to PV system performance and safety. Despite what marketing claims suggest about "MC4 compatibility," we don't have a universal PV connector standard—each company makes connectors their own way.
The National Electrical Code (NEC) 2020 tackles this in Section 690.33(C). It says: "Where mating connectors are not of the identical type and brand, they shall be listed and identified for intermatability, as described in the manufacturer's instructions". Here's what this means:
-
Use connectors of the same type and brand only
-
Your certification becomes void if you mix parts from different makers
-
Mixed connectors often lead to failures, power loss, and fire risks
Different manufacturers' connectors might fit together, but their internal contact tech usually differs in materials, size, and tolerances. These differences cause connection problems that you might not see right away but show up later due to temperature changes, vibration, and weather exposure.
Choosing Between Series and Parallel Configurations
Your solar panel connection setup affects system voltage, current, and overall performance. Series connections link panels one after another (positive to negative), which boosts voltage while keeping current steady. Parallel connections (positive to positive, negative to negative) keep voltage the same but increase current.
Series connections work best when:
-
Your inverter needs higher voltage
-
You have long cable runs (higher voltage cuts down transmission losses)
-
You don't have much shade across your setup
-
You've got a Maximum Power Point Tracking (MPPT) charge controller
Parallel connections make more sense when:
-
You need lower voltage and higher current
-
Some panels might get partial shade (one shaded panel won't affect the whole string)
-
You're using a Pulse Width Modulation (PWM) charge controller
-
You might want to add more panels later
Many home and business setups use both series and parallel connections for the best results. This setup lets you get the voltage your inverter needs while having backup if one string has problems.
The choice between series, parallel, or both should match your equipment needs, environmental conditions, and future plans. Whatever setup you choose, make sure your connectors can handle the maximum voltage and current they'll see in your specific system layout.
Materials and Methods: Tools and Cables for MC4 Installation
You need specialized tools and appropriate cables to install MC4 solar panel connectors properly. This ensures long-term reliability and safety. The right setup from the start prevents failures that could affect your entire system. Plus, choosing the right materials affects both how easy it is to install and how well your system performs over time.
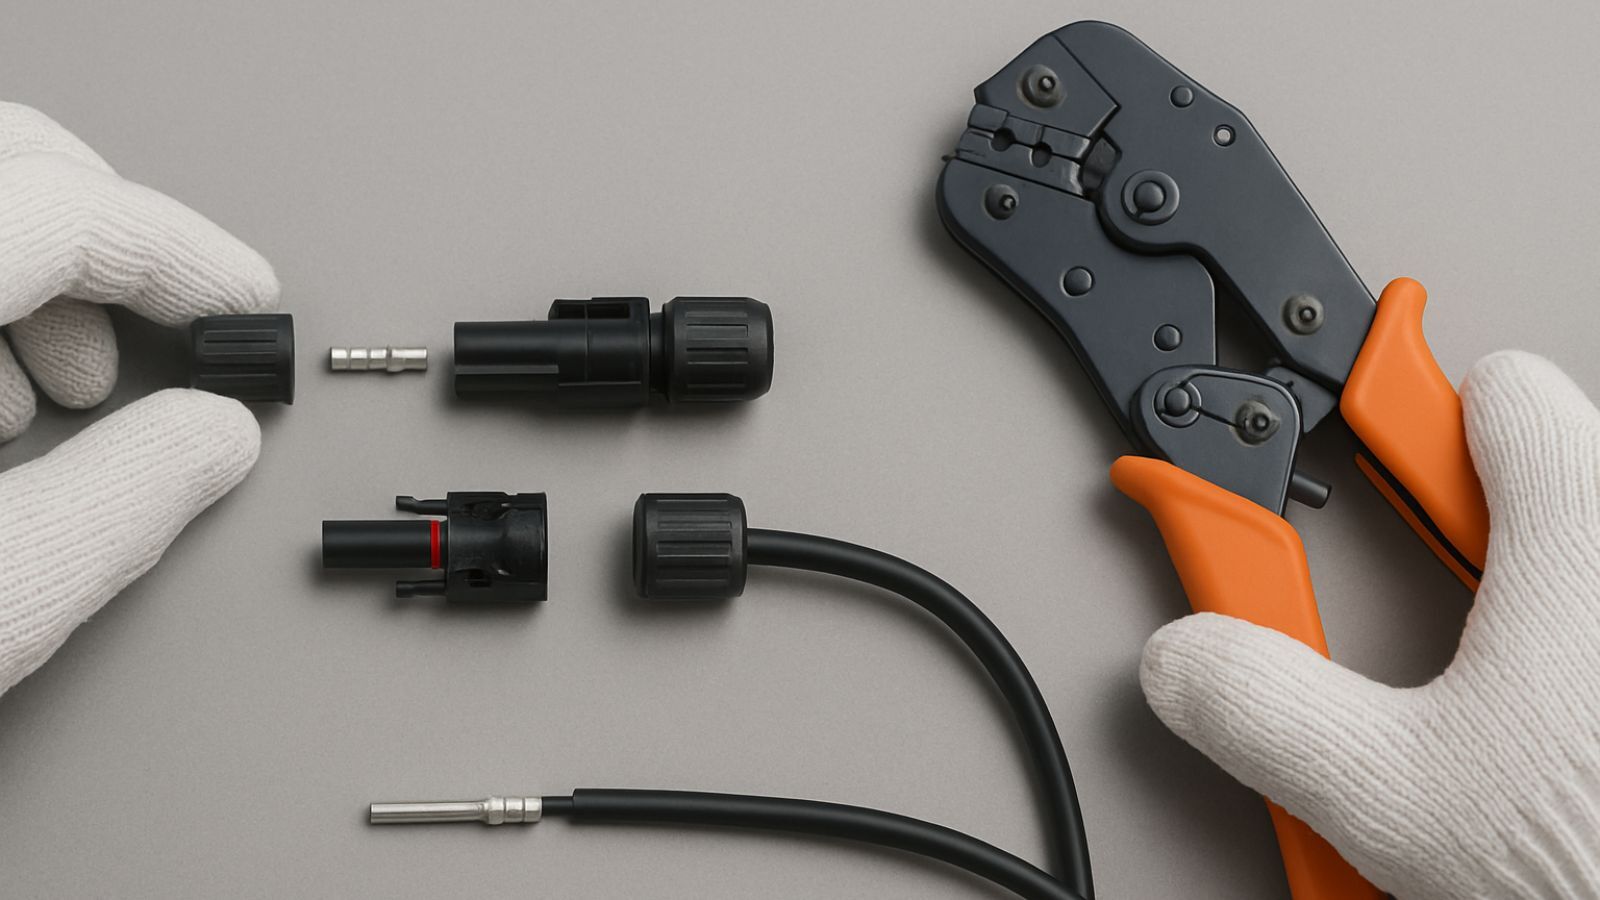
MC4 Crimping Tool and Wire Stripper Requirements
Reliable solar connections start with the right crimping tools made specifically for MC4 connectors. Regular crimpers won't do - MC4 crimping tools have precise dies that create consistent, high-pressure connections between the metal contact and solar cable. Quality crimpers come with a ratcheting mechanism that won't let go until proper crimping pressure is reached. This gives you uniform connections every time. The ratcheting design delivers about 1.2 metric tons of crimping force with minimal hand effort.
Your wire strippers must adjust to different cable diameters for solar installations. Professional-grade strippers come with precision-engineered cutting blades that handle 2.5mm², 4mm², and 6mm² solar cables (equivalent to 14, 12, and 10 AWG). You'll also need these tools to assemble MC4 properly:
-
MC4 spanner wrenches to tighten lock rings
-
Disconnect tools to separate connected MC4 components
-
Cable cutters for clean, precise cuts
Using Solar Panel Connector Cables with Correct Gage
The right cable gage choice affects your system's efficiency and safety. PV1-F solar cable stands as the industry standard because of its high UV resistance, durability, and MC4 connector compatibility. This cable comes in various sizes - 4mm² and 6mm² are most common.
Here's a quick guide: systems under 20A can use 4mm² cable, while those producing 20A or more need 6mm² cable. Your cable gage choice depends on:
-
Current capacity requirements
-
Distance between components
-
Acceptable voltage drop (keep it under 2-3%)
-
Environmental exposure conditions
Note that wire size changes resistance - thicker wires have less resistance, so electricity flows better over longer distances. Wrong cable sizing can lead to overheating, faster degradation, and safety risks.
MC4 Extension Cable Length Planning
MC4 extension cables work like regular extension cords but are built specifically for solar setups. Each cable has a male connector on one end and a female connector on the other. These cables range from 8 to 100 feet, though residential installations should keep cable runs under 100 feet to minimize power loss.
Measure the distance between solar panels and electrical equipment carefully when planning your installation. A 20-foot distance might need a 50-foot extension cable cut into two 25-foot leads - one with a male connector and one with a female connector. This gives you enough wire to reach your equipment while keeping proper connections.
Larger installations might make long cable lengths impractical. Combiner boxes offer a solution. They let you switch from MC4 cables to cheaper wiring (like THHN-rated insulation) inside electrical conduit, which cuts costs for longer runs.
Step-by-Step Guide to Installing MC4 Connectors
MC4 connectors need precise installation to create weather-resistant, lasting connections in your solar panel system. You can't see inside a properly installed connector after assembly because connected parts lock together permanently. Yes, it is worth noting that trying to open a field-made connector will destroy it. This makes it crucial to get the installation right the first time.
Stripping and Crimping 10 AWG PV Wire
Reliable solar connections are the foundations of proper PV wire preparation. Cut the solar cable to your desired length and leave enough slack to make adjustments later. Next, strip about 10-15mm (0.4-0.6 inches) of insulation from the cable end with a wire stripper. Be careful not to nick or damage the conductor strands - damaged wires can fail over time.
The stripped cable end goes into the metal contact (pin for male, socket for female) until it reaches the base. The conductor should not show outside the contact. Put the contact in the MC4 crimping tool through the die size that matches your cable gage - don't lay it flat. The tool creates a "B" or "butt-cheek" crimp to secure the contact to the wire. Give it a gentle pull to check if the connection holds.
Installing Male and Female Terminal Ends
Installers often miss the crucial step of terminal identification. The female terminal goes into the male housing, and the male terminal fits the female housing. This setup can be confusing. Before you crimp, slide the connector housing parts onto the cable: compression nut first, then compression ring, and finally the watertight seal.
Push the crimped terminal into its connector housing until you hear a click that shows the locking mechanism has engaged. The terminal should sit securely in the housing. The seal gland should then slide into the plug body and sit flush with the connector. A snug fit between the gray sealing gland and terminal creates a watertight seal.
Using Spanner Tools for Locking and Torqueing
In stark comparison to this common belief, plastic wrenches that come with MC4 connectors don't slip automatically at the right torque. These tools just aid the first connection. You'll need proper torqueing with manufacturer-approved torque wrenches. Start by hand-tightening the compression nut onto the connector housing.
MC4 spanner wrenches help secure the final connection without overdoing it. Too much force can harm the internal seals and affect the connector's IP rating. Professional installers use calibrated torque tools made for MC4 connectors. These tools come with comfortable grips and controlled tightening systems to prevent connection failures.
Check all connections after assembly. Look for gaps, loose parts, or exposed wires. The final step arranges the male and female connectors - push them together until they click. This creates a secure MC4 connection that will work throughout your solar system's life.
Limitations and Common Mistakes in MC4 Installations
MC4 connector failures are the most common problem in photovoltaic systems, even with the best practices in place. Solar panel connector problems show that interconnection deficiencies cause the highest number of system failures. These small components can create major safety hazards if installers don't match or install them correctly.
Incorrect Polarity and Voltage Drop Issues
Solar installations often face dangerous conditions due to polarity errors. Female MC4 connectors usually connect to positive leads and male connectors link to negative ones. This standard doesn't apply to all manufacturers. Some solar panels come with reversed polarity that uses positive male connectors and negative female connectors. This lack of consistency results in many installation errors where positive cables end up connected to negative terminals.
Polarity reversal can destroy charge controllers, inverters, and junction boxes. There's another reason systems fail - voltage drop issues happen when installers use wrong-sized conductors for parallel configurations. Undersized wires get too hot and speed up system degradation, which reduces energy production.
Improper Crimping Leading to Arcing
Fire hazards in solar installations often stem from badly crimped connections. Metal contacts that aren't secured properly to solar cables create tiny gaps. Electricity jumps between these surfaces and generates extreme heat. The arcing gets hot enough to melt nearby components and can set surrounding materials on fire.
Installers create crimping problems by:
-
Using wrong tools like pliers instead of specialized MC4 crimpers
-
Not applying enough pressure during crimping
-
Not inserting wires fully into metal contacts
These mistakes result in loose connections, overheating parts, and system performance that gets worse over time.
Using Non-UL Listed or Mismatched Connectors
The solar industry faces systemic problems because of the "MC4-compatible" connector myth. No universal solar connector standard exists, but installers still connect different manufacturers' connectors. Stäubli's installation manual warns that non-Stäubli connectors claiming "MC4-compatibility" aren't safe for electrical connections.
The National Electrical Code bans connecting different connectors unless they've been tested and certified together. This rule exists because connectors from different makers have small design differences that prevent proper, watertight connections. These mismatched parts become the main cause of system failures when exposed to heat cycles, vibration, and weather.
Conclusion
The MC4 connectors you choose for your solar panel system will affect both safety and performance for years to come. MC4 connectors have become the industry standard and now hold 50% of the market share due to their reliable and weatherproof design. These connectors can handle extreme temperatures from -40°C to +90°C and come with secure locking mechanisms to prevent disconnections. The differences between connector types like standard MC4 and MC4-EVO2 will help you pick the right components based on your installation's voltage and current needs.
Safety should be your top priority when dealing with solar panel connectors. The National Electrical Code requires you to use connectors from the same manufacturer to avoid cross-mating dangers. No universal standard exists despite claims of "MC4 compatibility." Mismatched connectors cause more solar system failures than anything else. Your system's reliability depends on proper installation techniques - correct wire stripping, precise crimping, and appropriate torqueing.
Your solar project's success depends on choosing the right configuration - series, parallel, or hybrid - based on voltage requirements and environmental conditions. You'll need specialized tools like ratcheting MC4 crimpers during installation. Matching the correct cable gage to your system's current load helps prevent voltage drops and overheating. These small details determine whether your solar array runs efficiently for decades or fails prematurely.
This guide's knowledge will help you make smart choices about MC4 connector selection and installation. While connectors might seem minor, they form a crucial link in delivering reliable solar power. Taking time to select and install the right connectors now will save you from expensive repairs and dangerous electrical hazards. Your renewable energy investment will perform better and last longer with proper connector choices.
FAQs
Q. What size MC4 connector should I use for my solar panels?
A. The size of MC4 connector you need depends on your solar panel's output. Generally, 4mm² connectors are suitable for systems generating less than 20A, while 6mm² connectors are recommended for systems producing 20A or more. Always match the connector size to your cable gage and system requirements.
Q. Are all MC4 connectors compatible with each other?
A. No, not all MC4 connectors are compatible. Despite marketing claims of "MC4 compatibility," there's no universal standard. It's crucial to use connectors from the same manufacturer to ensure proper fit and avoid potential safety hazards. The National Electrical Code prohibits mixing connectors from different brands.
Q. How can I identify male and female MC4 connectors?
A. Male MC4 connectors have a protruding metal pin, while female connectors contain a metal socket. Typically, the female connector is attached to the positive lead, though exceptions exist. This design prevents accidental connections of two positive or two negative wires.
Q. How many MC4 connectors do I need per solar panel?
A. Each solar panel typically requires two MC4 connectors - one male and one female. These connectors allow you to link panels together in series or parallel configurations, depending on your system design and voltage requirements.
Q. What are common mistakes to avoid when installing MC4 connectors?
A. Common mistakes include incorrect polarity connections, improper crimping leading to arcing, and using mismatched or non-UL listed connectors. Always use specialized crimping tools, ensure correct polarity, and avoid mixing connectors from different manufacturers. Proper installation is crucial for system safety and longevity.