Essential Drone Parts: A Comprehensive Guide
Published by Amit Saxena on 29th Aug 2024
, and flight controller")
After helping over 1,000 customers select their first drone components at Evelta, we've noticed something interesting: the questions everyone asks aren't about complex aerodynamics or programming - they're refreshingly practical. "Will this motor work with that ESC?" "Why are some frames ₹2,000 and others ₹20,000?" "What's the difference between F4 and F7 flight controllers, really?"
This guide tries to answer those exact questions. We'll walk through each essential drone component not from a textbook perspective, but from the viewpoint of someone standing in front of a parts catalog for the first time. By the end, you'll understand not just what each part does, but why it matters for your specific build; and which specifications you can safely ignore. We’ll use a 5 inch FPV quad as the default example, and the same principles apply to other sizes and styles.
Table of Contents:
- Frame: The Skeleton of Your Drone
- Motors: Powering Your Drone's Flight
- Propellers: Generating Lift and Thrust
- Flight Controller: The Brain of Your Drone
- Electronic Speed Controllers (ESCs)
- Gimbals and Cameras: Expanding the Drone’s Eye
- Communication Systems: Transmitters and Receivers
- Additional Accessories (Switches, Relays, etc.) for Advanced Control
- Major Application Areas
- Conclusion
- Frequently Asked Questions
Frame: The Skeleton of Your Drone
The 30-Second Version
For a first 5 inch quad, choose a durable carbon fiber frame with replaceable 5 mm arms, a top-mount battery, and room for a standard stack. Look for wheelbase ~220 to 250 mm, 30.5 x 30.5 mm stack holes for FC and ESC, plus 20 x 20 mm holes in the rear for VTX if possible. Pick micro camera size (19 mm) side plates and 16 x 16 mm M3 motor mounts on the arms. That combo is beginner friendly and tough enough to survive your "learning opportunities" (aka crashes).
Size, Materials, and Weight
- Material: Carbon fiber is the default for 5 inch. It is stiff, durable, and easy to repair.
- Wheelbase: Most 5 inch frames sit between 220 and 250 mm. Anywhere in that band is fine for learning.
- Weight targets:
- Freestyle beginner frames: 110 to 140 g (sturdier, easier to live with).
- Racing style frames: 65 to 100 g (lighter, but less forgiving in crashes).
- Arms: Go 5 mm thick for durability while you are learning. Replaceable arms save money and time.
Geometry: How It Flies and What You See (Spoiler: Mostly Sky and Ground)
- True X or Squished X: Balanced feel and predictable handling. Great for learning.
- Deadcat: Front arms spread wider so props stay out of HD camera view. Slightly different feel but very popular for freestyle and filming.
- Top-mount vs bottom-mount battery:
- Top-mount balances well and keeps the battery safer in grass and dirt.
- Bottom-mount can feel a bit more locked-in for racing, but it is easier to scuff packs.
Mounting Patterns and Compatibility
- Electronics stack:
- 30.5 x 30.5 mm, M3 for standard 5 inch stacks.
- 20 x 20 mm, M2 often used for VTX or lighter stacks.
- Some modern frames also support 25.5 x 25.5 mm, M2 AIO boards.
- Camera:
- Micro 19 mm side plates fit most FPV cams.
- Nano 14 mm is common on very light builds; use adapters if needed.
- Motors:
- Arms should have 16 x 16 mm, M3 holes for 22xx and 23xx motors. That is the 5 inch standard.
Build Friendliness Features
- Replaceable individual arms with simple, non-stack bolts so you can change an arm without taking the whole quad apart.
- Rear 20 x 20 mm mounting for VTX.
- Plenty of space between top and bottom plates so the stack breathes and wiring is not crushed.
- Chamfered or rounded arm edges to reduce splinters and protect battery straps.
- Printed or rubber camera protectors and a GoPro mount option if you plan to record HD.
Durability Tips (How to Crash Less Expensively)
- Use at least two battery straps and a non-slip pad on the top plate to stop the pack from ejecting.
- A small front and rear bumper or skid helps with rough landings.
- Add a self-powered buzzer so you can find the quad in tall grass after a tumble.
- Use a dab of thread locker on metal-to-metal screws. Do not use it on plastic.
Common Frame Styles by Prop Size
- 2 to 3 inch: 100 to 150 mm wheelbase, XT30 power connectors, 20 x 20 or 25.5 x 25.5 boards.
- 5 inch: 220 to 250 mm wheelbase, XT60, 30.5 x 30.5 stacks, 5 mm arms.
- 7 inch long range: 295 to 320 mm wheelbase, reinforced arms, lots of space for GPS and bigger antennas.
Look for:
- Wheelbase 500 to 680 mm with room for 11 to 15 inch props
- Landing gear and clear gimbal space up front
- Foldable or reinforced arms for transport and durability
- Mounting for APM or Pixhawk style FCs, GPS mast, and tidy power distribution
Red Flags To Avoid (Learn From Other's Mistakes, Not Your Wallet)
- Full aluminum or plastic plates on a 5 inch frame. They bend or crack too easily.
- No stack clearance or awkward standoff placement that pinches the FC soft mounts.
- Single-bolt arm retention that wiggles after a few crashes.
- Camera side plates that only fit nano width when you own a micro cam.
Your First Frame Purchase Checklist
- ✅ Carbon fiber with replaceable 5 mm arms
- ✅ Wheelbase ~220 to 250 mm for 5 inch props
- ✅ Top-mount battery layout and room for two straps plus a battery pad
- ✅ 30.5 x 30.5 mm stack holes for FC and ESC, plus 20 x 20 mm rear holes for VTX
- ✅ Micro 19 mm camera side plates or adapters included
- ✅ 16 x 16 mm M3 motor mount holes in the arms
- ✅ Spare arm and hardware kit available, or at least easy to source
Final thought: Get something solid that can handle your "creative flying style" while you figure out which trees are magnetic (spoiler: all of them). The good news? Every crash makes you better, and carbon fiber is surprisingly forgiving. Your wallet, however, is not.
Batteries & Power 101
The 30-Second Version
For a first 5 inch build, pick one of these and you are set:
- 4S LiPo, 1300 to 1500 mAh, XT60 connector. Pairs well with 2400 to 2550 KV motors.
- 6S LiPo, 1000 to 1100 mAh, XT60 connector. Pairs well with 1750 to 1900 KV motors.
Can't decide between 4S and 6S? Start with 4S. it's more forgiving and batteries cost less. Add a balance charger, a LiPo safe bag, and make sure your ESC and flight controller are rated for the pack voltage.
What “S” Means
“S” is the number of LiPo cells in series, which sets voltage.
- 4S = 4 cells, about 14.8 V nominal and 16.8 V full.
- 6S = 6 cells, about 22.2 V nominal and 25.2 V full.
Match motor KV to cell count. Lower voltage wants higher KV, higher voltage wants lower KV. That is why 4S pairs with around 2400 to 2550 KV on 5 inch, and 6S pairs with around 1750 to 1900 KV.
Capacity, Flight Time, and Weight
Capacity is in mAh. Bigger number usually means longer flight time, but also more weight. Your goal is a pack that gives you 3 to 5 minutes of confident flying without making the quad feel heavy or sluggish. For a 5 inch beginner build:
- 4S: 1300 to 1500 mAh is the common sweet spot.
- 6S: 1000 to 1100 mAh is the common sweet spot.
Tip: land while cells are still healthy. After the pack rests, aim to be around 3.6 to 3.8 V per cell. Going much lower shortens battery life fast.
C Rating, Without The Marketing
C rating claims how much current a pack can deliver. Rough rule:
Max current (A) ≈ Capacity (Ah) x C rating.
Example: 1500 mAh is 1.5 Ah. Labeled 75C gives 1.5 x 75 = 112.5 A on paper.
Reality check: labels are often, let's say, 'optimistic'. Plan on about half the sticker as a safe continuous number. If your voltage sags hard below 3.3 V per cell during punch outs, the pack is either too small, too tired, or not as “C” as advertised.
Connectors and Leads
- XT60 is the standard on 5 inch builds. XT30 is common on 2 to 3 inch micros.
- Every LiPo has a balance lead. Use it for balance charging every time.
- Typical wire gauge for 5 inch main leads is 14 AWG or 16 AWG. Match the connector on your ESC or be ready to solder a pigtail.
Power Distribution, The Quick Map
Battery → 4-in-1 ESC or AIO → Flight Controller → Peripherals.
- Your ESC or AIO usually provides regulated rails like 5 V and sometimes 9 V.
- Power VTX and receiver from the regulated rails, not raw battery voltage, unless the device is rated for VBAT.
- A smoke stopper on the very first power up can save your electronics if there is a short.
Charging Basics
- Balance charge every time.
- 1C is the default safe rate. A 1500 mAh pack charges at 1.5 A. Faster is possible but not needed for beginners.
- Double check the charger sees the correct cell count and target voltage before you hit Start.
- Storage at about 3.8 V per cell if you will not fly for a few days.
Safety Essentials
- Charge on a non-flammable surface, inside a LiPo safe bag, and never unattended.
- If a pack is puffed, punctured, or very hot, stop using it. Recycle at an e-waste facility.
- Keep packs away from sharp carbon edges. Use a battery strap and a non-slip pad so the pack cannot eject into the props.
Common Mistakes To Avoid
- Buying 6S packs then using high KV motors meant for 4S.
- Powering VTX or camera from VBAT when they expect a clean 5 V or 9 V rail.
- Mixing XT30 and XT60 without adapters or re-soldering.
- Charging in fast mode or without the balance lead.
- Flying packs down to the point the quad falls out of the sky. That ruins batteries quickly.
Your First Battery Purchase Checklist
- ✅ Cell count fits motors and ESC. 4S with around 2400 to 2550 KV on 5 inch, or 6S with around 1750 to 1900 KV.
- ✅ Capacity: 1300 to 1500 mAh on 4S, or 1000 to 1100 mAh on 6S, for a first 5 inch build.
- ✅ Connector matches your rig. XT60 for 5 inch is standard.
- ✅ C rating that is believable. Prefer reputable brands and avoid too-good-to-be-true labels.
- ✅ Balance charger that supports LiPo, balance mode, and storage mode.
- ✅ LiPo safe bag for charging and transport.
- ✅ Spare packs if budget allows. Two to four packs make practice sessions worth the trip.
Motors: Powering Your Drone's Flight
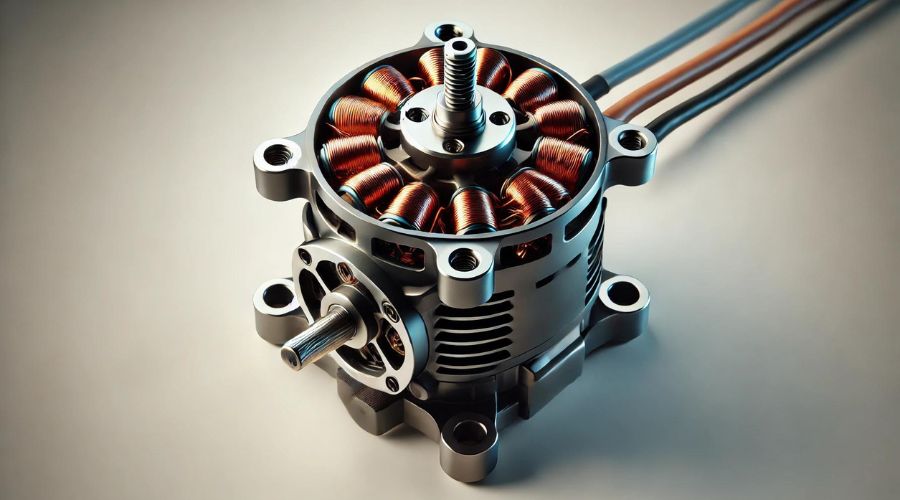
The 30-Second Version: For your first 5-inch build, grab four 2207 or 2306 brushless motors. Trust us on this one.
- Building on 4S? Go with ~2400-2550 KV (the sweet spot that just works)
- Going 6S? Pick ~1700-1900 KV (what most pilots fly today)
Expect to spend ₹500-₹1,500 per motor (ex-GST) for reliable brands and yes, it’s worth avoiding the bargain bin here. This combo covers ~90% of beginner builds, and honestly? You’ll probably love these motors for months before wanting anything different.
Now, let’s understand why these numbers matter and when you might choose differently.
Understanding Motor Sizes (It’s Simpler Than It Looks)
Motor sizes use a four-digit code that actually makes sense once you know the secret:
- 2207 = 22 mm stator diameter, 7 mm stator height
- 2306 = 23 mm stator diameter, 6 mm stator height
Here’s how it feels in the air: wider stators (like 2306) give you that smooth, predictable power perfect when you’re learning or trying to nail that gap. Taller stators (like 2207) are punchier, more “right now!” which is why racers love them. Many beginners start with 2306 for its smooth feel; 2207 is equally popular once you want more punch.
Common pairings by drone type (so you know you’re in good company):
- 2.5–3″ props: 1404–1506 motors (tiny rockets)
- 5″ props (where everyone starts): 2205–2306, 2207
- 7″ long-range cruisers: 2806–2808 / 3106
KV Rating: Your Speed vs. Control Choice
KV tells you how fast a motor spins per volt with no load. But what does that mean for your thumbsticks?
- Higher KV (≈2400-2750 on 4S): snappier, more aggressive - think caffeinated flying
- Lower KV (≈1700-2100 on 6S): smoother, more efficient - like having power steering
Where beginners thrive:
- 4S 5″: ~2400-2550 KV (responsive but forgiving)
- 6S 5″: ~1750-1900 KV (modern standard, buttery smooth)
Real-world example that’ll save your motors: A 2450 KV motor on 4S (~14.8 V) spins around 36,000 RPM unloaded perfect. Put that same motor on 6S (~22.2 V) and it’ll try for 54,000 RPM which can over-current/overheat with 5″ props (hello magic smoke). Always match KV to your battery (learned this one the expensive way).
Brushless vs. Brushed (Spoiler: You Want Brushless)
Unless you’re building a tiny whoop for flying around your living room, go brushless. Here’s why everyone does:
- They last forever (okay, not forever, but close, no brushes to wear out)
- Noticeably more flight time from better efficiency
- Way more power when you need it (and smoother when you don’t)
Yes, they cost more than brushed (₹1,500 vs ₹300), but think of it this way: brushed motors are like disposable batteries, brushless are like rechargeables. You’ll thank yourself later.
The one exception: Tiny whoops sometimes use brushed 8520 motors because they’re adorably small and cheap. That’s really it.
Mounting: The Details That Matter
Most modern 22xx/23xx 5″ motors use a 16×16 mm M3 bolt pattern. Some models also use 16×19 mm - always check your frame and the motor product page. This isn’t the place for “it’ll probably fit.”
Prop hub fit: 5″ builds use a standard 5 mm shaft with an M5 prop nut; smaller props (2–3″) may use T-mount (2-bolt). Make sure your prop hub matches your motor’s shaft/bolt style.
The screw-length tip that’ll save your motors: Before you mount anything, test-fit your screws without props. Thread them in gently - if you feel any resistance before the screw head touches the arm, STOP. That’s the screw hitting the windings, and one more turn means a dead motor. Ask anyone who’s killed a motor this way (spoiler: everyone has at least one story).
Motor Direction and Wiring
You need two motors spinning CW and two CCW. The good news? Modern setups make this painless:
- Pick props-in or props-out in Betaflight (props-out looks cooler in footage, just saying)
- Reverse any motor in BLHeli Configurator with a few clicks
- Or go old school: swap any two of the three motor wires to reverse direction
Some listings still separate “CW” and “CCW” versions - if you see this, buy two of each; most 5″ motors use standard M5 prop nuts, and you can still reverse spin direction in software if needed. It’s like buying left and right shoes when they’re actually both adjustable.
What Your Budget Gets You (The Honest Truth)
- ~₹350-₹1000 (ex-GST): Entry-level - they’ll fly, you’ll learn, but you’ll upgrade within months
- ~₹1,000-₹1,950 (ex-GST): The sweet spot - smooth, reliable, what most of us fly daily
- ₹2,000-₹4,000+: Premium stuff - lighter, smoother, for when you can feel the difference (you’ll know when you’re ready)
Pro tip: Start in the sweet spot. Budget motors will frustrate you, and premium motors won’t make you a better pilot (yet).
Red Flags to Avoid (Save Your Money)
We’ve all been tempted by that too-good-to-be-true deal. Here’s what to run from:
- No brand or suspiciously vague specs (“powerful motor for drone” is not a spec)
- No thrust data or test results (legit manufacturers always test their stuff)
- Unusually light for the class (watch for copper-clad aluminum windings)
- Reviews mentioning “arrived bent” or “bearings feel gritty” (QC matters)
If the price seems impossible, it probably is. One crashed motor costs more than you “saved.”
Your First Motor Purchase Checklist
Before clicking “buy,” make sure you’ve got:
- ✅ Matching bolt pattern (16×16 for most, maybe 16×19) that fits your frame
- ✅ Prop hub fit: 5″ = 5 mm shaft + M5 nut; micro props may be T-mount (2-bolt)
- ✅ Right KV for your battery: ~2400-2550 KV for 4S, ~1750-1900 KV for 6S
- ✅ Set of 4 (grab a spare if budget allows future you will thank you)
- ✅ Correct screw lengths in your cart (or reuse from old motors if they fit)
- ✅ Actual brand with real specs (KV, weight, thrust data not just marketing fluff)
- ✅ If buying “CW/CCW” versions, two of each (you can still reverse in software anyway)
Final thought: Your first motors don’t need to be perfect they need to be reliable. Get something decent, learn to fly, and upgrade when you know what you actually want. We all started somewhere, and honestly? Those first motors will always be special, even after you’ve moved on to fancier stuff.
Propellers: Generating Lift and Thrust
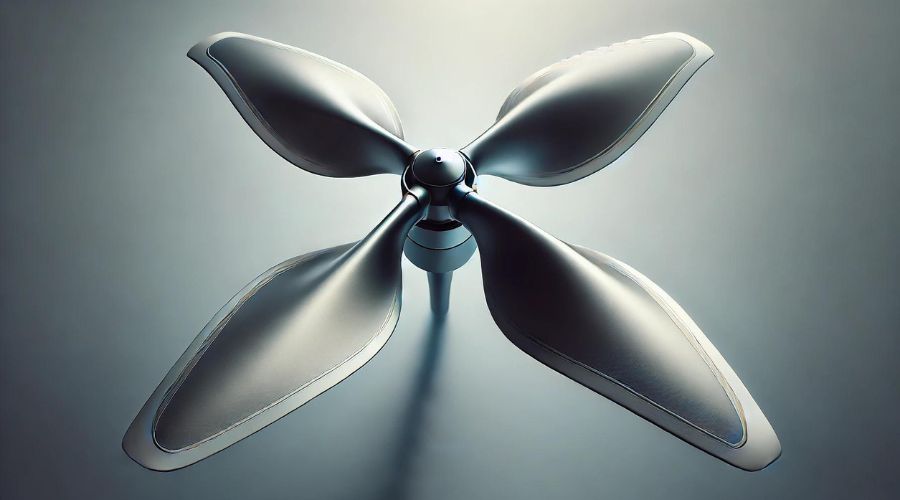
30-Second Version
Default for a 5-inch freestyle build: 5×3.6 to 5×4.0, tri-blade, durable polycarbonate, M5 hub. This is the common starting point for 5-inch freestyle and for good reason.
- Learning or smooth cruising: lower pitch (about 3.1 to 3.5)
- Punchier or racing: mid to high pitch (about 4.0 to 4.3), lightweight tri-blade
- Long-range 7-inch: bi-blade, low pitch for efficiency
- Cinewhoop 3 to 3.5 inch: ducted, low-pitch tri or quad for stable footage
- Buy enough: 3 to 5 full sets per field day
What Actually Changes the Feel
Diameter: Larger disc equals more thrust and higher current. 5-inch is the all-round FPV sweet spot. It is big enough to perform and small enough to avoid draining the pack too fast.
Pitch: Higher pitch bites more air which means more speed and more amps. Lower pitch is smoother and extends flight time. Think of pitch like gears on a bike.
Blade count:
- 2-blade: efficient with a floaty feel
- 3-blade: the 5-inch default for grip and control
- 4 or 5 blades: extra stability in ducts with less efficiency and a sharper sound
Material and stiffness: Polycarbonate is standard. Stiffer feels sharper but may snap on impact. Softer survives knocks but can feel mushy. Glass-fiber mixes exist and are worth considering once you can feel the difference.
Weight: Lighter props spin up faster and feel more responsive. Heavier props add load on motors and ESCs.
Match Props to Your Motors and Battery
4S, 2306 to 2207 at 2400 to 2700 KV: Start with 5×3.1 to 5×3.6 tri-blade. This is a proven combo.
6S, 2207 at 1700 to 2000 KV: Start with 5×3.6 to 5×4.0 tri-blade. This is the modern standard.
Temperature check: After any prop change, do a 15-second punch-out and touch the motors. If they are too hot to keep a finger on, the prop is too aggressive for your tune or conditions. There is a risk of overheating or burnouts.
Quick Picks by Goal
- Beginner 5-inch freestyle: 5×3.6 to 5×4.0 tri-blade, durable PC
- Racing: 5×4.0 to 5×4.3 tri-blade, lightweight PC which means higher amp draw and shorter flights
- Cinewhoop 3 to 3.5 inch: low-pitch tri or quad to reduce noise and jello
- Long-range 7-inch: 7×3 to 7×3.5 bi-blade for efficiency and cooler motors
- Low-noise parks: drop pitch one step or reduce blade count
Fitment and Installation
- Hub type: 5-inch uses M5 with a nyloc locknut which helps prevent loosening. Micros often use T-mount 1.5 mm with two screws.
- Direction: Install CW and CCW correctly. Props-out helps keep the camera cleaner. Props-in also works.
- Orientation: Numbers or logo side typically faces up. Follow the small arrow on the blade if present.
- Clearance: Ensure tips cannot clip ducts, battery straps, or TPU guards during flex.
Common Mistakes to Avoid
- Jumping straight to high-pitch props on a fresh build
- Mixing brands or weights across arms
- Ignoring obvious warps or heavy flashing that throw balance off
- Choosing ultra-soft indestructible props that hurt control feel
- Over-tightening prop nuts which risks stripped threads
Buyer Checklist
Before you add to cart:
- ✅ Size and pitch that match your motor KV and cell count
- ✅ Correct hub type which is M5 for 5-inch or T-mount for micros
- ✅ 3 to 5 full sets for the field, plus spare lock nuts and a prop tool
- ✅ One or two low-pitch sets for learning and tuning which is 3.1 to 3.5
- ✅ A mid-pitch set once you are comfortable which is 3.6 to 4.0
- ✅ Optional high-pitch set for testing which is 4.3 and above
- ✅ Known brand with consistent quality
Final thought: Your first propellers will die heroic deaths because it is part of learning. Start durable and mid-pitch, then step up as your tune and thumbs improve. Props are cheap. Motors and ESCs are not.
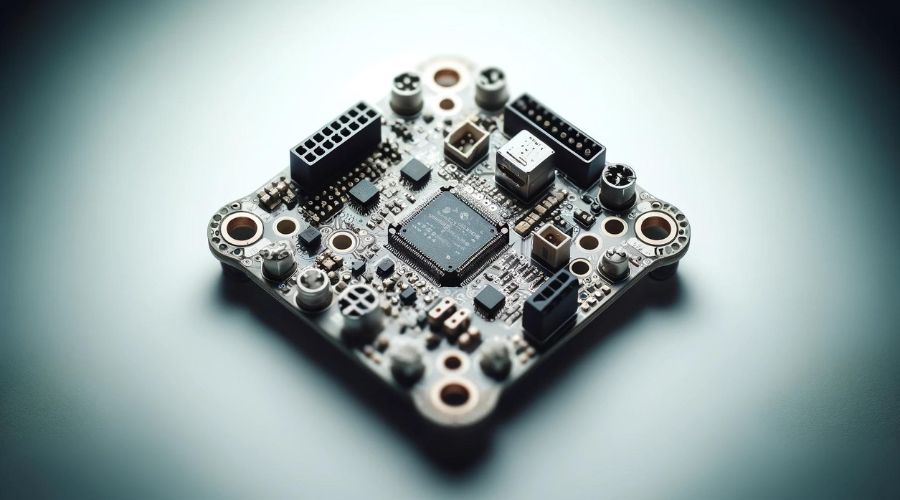
Flight Controller: The Brain of Your Drone
30-Second Version
- Default for 5 inch freestyle: an F7 flight controller on a 30.5 x 30.5 mm mounting pattern, paired with a 35 to 60 A 4 in 1 electronic speed controller (ESC) using an 8 or 10 pin cable harness.
- Power needs: clean 5 V 2 A for receiver and accessories, plus 9 V 2 A if you run HD video or a higher power analog video transmitter.
- Connections: at least 5 UARTs which are serial ports, so you can plug in the radio receiver, video transmitter control, GPS, and telemetry without juggling.
- Quality of life: on screen display (OSD), 16 MB or more blackbox logging, USB C, and an optional barometer for altitude readouts.
- Firmware: Betaflight for freestyle and racing. Use iNav if you want GPS features. For mission planning and larger platforms, consider ArduPilot.
What a Flight Controller Does
The flight controller reads the gyroscope, listens to your radio commands, runs the control loop, and tells each ESC how fast to spin its motor. It also routes power to peripherals and overlays OSD on your video feed. If the flight controller reboots or loses power in flight, the quad will fall. Solid power and clean wiring matter as much as the processor.
Processor Types
- F4: capable for basic builds but usually fewer UARTs and more workarounds.
- F7: the sweet spot for 5 inch. More I O, easier serial handling, and enough headroom for filters and OSD.
- H7: fastest and feature rich. Useful for complex builds but not required for a typical 5 inch freestyle quad.
AIO vs Separate Stack
- All in one flight controller with integrated ESC: compact and light. Best for whoops and micros. If one section fails, the whole board may need replacement.
- Separate flight controller plus 4 in 1 ESC: common for 5 inch. Easier part replacement, better thermal handling, and a cleaner layout.
Specs That Actually Matter
- Mounting pattern: 30.5 x 30.5 mm with M3 hardware is the 5 inch default. 20 x 20 mm with M2 for light builds. 25.5 x 25.5 mm with M2 is whoop style.
- UART count: plan one each for the radio receiver, video transmitter control, GPS, and optional telemetry or HD system. Aim for 5 or more.
- BECs: battery eliminator circuits that provide regulated voltage. 5 V 2 A minimum for peripherals. 9 V 2 A is ideal for video transmitters. Check the total current draw for camera, VTX, receiver, and LEDs.
- Gyro: common chips like BMI270, ICM series, or MPU series all work. Stability depends more on tune and soft mounting than the logo on the sensor.
- Blackbox: 16 MB or more helps with tuning and debugging.
- ESC connector: 8 or 10 pin harness simplifies wiring. If you direct solder, triple check motor order before first spin.
- USB C and a barometer are useful quality of life features.
Compatibility and Protocols
- Battery support: most modern stacks support 3 to 6S. On 6S, prefer stacks with a dedicated 9 V BEC for the video transmitter.
- Motor protocol: set DShot300 or DShot600 for 5 inch. Enable bidirectional DShot to unlock RPM filtering from ESC telemetry.
- Radio receiver: connect ExpressLRS which is ELRS or similar on a free UART. Set the correct serial protocol in firmware and bind before closing the stack.
- Video system: analog or HD both work. Use the 9 V rail for the video transmitter when available and configure VTX tables in firmware.
- GPS: needs a clean 5 V rail and a free UART. Mount the GPS away from noisy power wiring.
Installation Tips
- Orientation: the arrow on the PCB points forward. If you rotate the board, set board alignment in firmware before the first hover.
- Soft mounting: use rubber gummies and avoid over tightening. Do not preload the stack with twisted or tight wires.
- Grounding: keep video grounds consistent between camera, video transmitter, and flight controller to reduce noise.
- Capacitor: add a low ESR capacitor at the ESC battery pads to protect the flight controller from voltage spikes.
- First power up: use a smoke stopper which is a current limiter and power up with props off. If LEDs flicker or the board reboots, check the 5 V and 9 V rails.
Setup Order That Saves Time
- Update firmware which is usually Betaflight and reset to defaults.
- Set board alignment and receiver protocol. Confirm stick movements in the receiver tab.
- Map motors and run the motor direction wizard with props off.
- Select DShot rate and enable bidirectional DShot. Confirm RPM filtering is active.
- Configure OSD elements and video transmitter tables.
- Set arming switch, failsafe, and beeper.
- Do a hover test and a short flight. Log blackbox if available.
Common Mistakes To Avoid
- Picking an F4 with too few UARTs and running out of ports.
- Powering a hungry video transmitter from a weak 5 V pad. Use 9 V when available and respect current limits.
- Mounting the flight controller hard against the frame which feeds vibration into the gyro.
- Forgetting board alignment after rotating the flight controller.
- Skipping the capacitor and then chasing video noise or random reboots.
- Not checking motor direction before the first flight.
- Buying from unknown sellers without documentation or warranty.
Buyer Checklist
- F7 flight controller, 30.5 x 30.5 mm mounting, paired with a 35 to 60 A 4 in 1 ESC.
- At least 5 UARTs, 5 V 2 A BEC, and 9 V 2 A if you run HD or a strong analog video transmitter.
- OSD, 16 MB or more blackbox storage, and USB C.
- Includes 8 or 10 pin ESC harness and clear pinout documentation.
- Known brand from a trusted seller with accessible manuals and firmware target support.
- Add a low ESR capacitor and a smoke stopper to your cart.
Quick Terms Decoder
- FC: flight controller which is the main control board.
- ESC: electronic speed controller that powers the motors.
- BEC: battery eliminator circuit that provides regulated voltage like 5 V or 9 V.
- UART: serial port used to connect peripherals such as the receiver, video transmitter, and GPS.
- OSD: on screen display which overlays flight data on the video feed.
- DShot: digital motor protocol between flight controller and ESC. Bidirectional DShot sends motor RPM back for filtering.
- RPM Filtering: uses motor speed data to reduce vibrations in the control loop.
- ELRS: ExpressLRS which is a modern long range radio link.
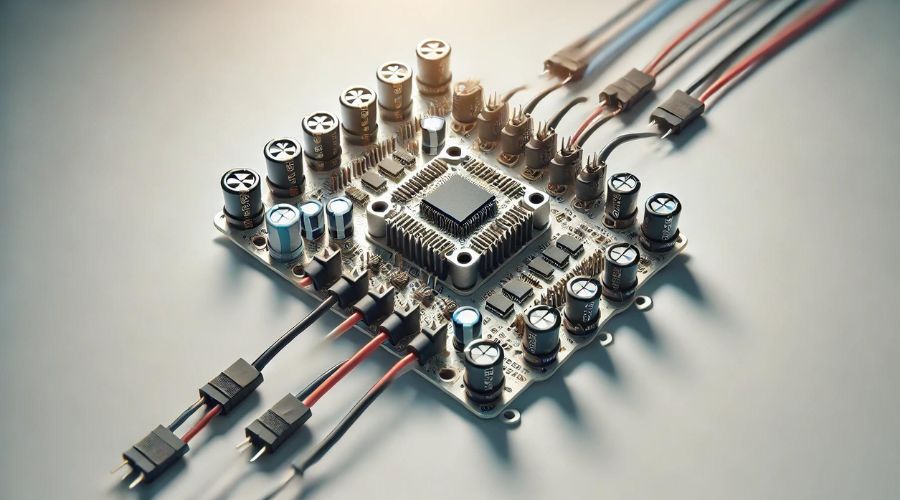
Electronic Speed Controllers (ESCs)
30-Second Version
- Default for a 5 inch freestyle build: a 4 in 1 ESC rated 35 to 60 A per channel, 3 to 6S compatible, on 30.5 x 30.5 mm with M3 hardware, connected to the flight controller by an 8 or 10 pin harness. This is the motors' power delivery system. Get it right or nothing else works well.
- Protocols: set DShot300 or DShot600. Enable bidirectional DShot for RPM filtering.
- Firmware: BLHeli_32 or BLHeli_S. Many BLHeli_S units can run Bluejay to add RPM telemetry.
- Power health: add a low ESR capacitor at the battery pads, and power video gear from regulated flight controller rails such as 9 V when available.
What an ESC Actually Does
The ESC converts battery power into precisely timed 3-phase drive for each motor - think of it as the translator between your flight controller's digital commands and the motor's need for actual power. It executes throttle commands from the flight controller and reports telemetry such as RPM when enabled. Without it, your motors are just expensive paperweights.
Stable power and correct wiring protect both the ESC and the flight controller. Get this wrong and you'll learn what "magic smoke" smells like (hint: expensive).
4 in 1 vs Single ESCs
- 4 in 1 ESC: Four channels on one board. Clean wiring, easy stack build, common for 5 inch quads. If one channel dies, you replace the whole board, but honestly? Modern 4 in 1s are reliable enough that this rarely matters.
- Single ESCs: One channel per board. Useful for planes, very large frames, or to replace a single failed channel. More wiring work, but you can replace just what breaks.
For 5 inch, use a 4 in 1.
Specs That Matter
- Current rating: size to continuous current with headroom. 35 to 45 A covers most 5 inch props. 50 to 60 A adds margin for hot weather or aggressive props. Ignore burst numbers.
- Voltage range: 3 to 6S for modern 5 inch builds. Match your battery to the ESC rating. A 6S battery on a 4S-only ESC equals instant fireworks.
- Mounting: 30.5 x 30.5 mm M3 for 5 inch. 20 x 20 mm M2 for lighter builds.
- Connector: 8 or 10 pin harness to the flight controller. Match pinouts before power.
- Telemetry: bidirectional DShot enables RPM filtering in the flight controller.
- Current sensor: many 4 in 1 ESCs expose an analog current sensor to the flight controller for OSD mAh and amp draw.
- Protection and filtering: pads sized for a low ESR capacitor. A TVS diode on battery pads is a plus for spike protection.
Compatibility and Wiring
- Power rails: Most 4 in 1 ESCs do not provide a 9 V rail. Power the video transmitter from the flight controller's regulated 9 V output when available. Trying to run a hungry VTX from 5 V is asking for video problems.
- Grounds: Keep video grounds consistent in a single path such as camera to flight controller to video transmitter. This reduces noise.
- Motor order and direction: Set in firmware with props off, then run the motor direction wizard.
Installation Tips
- Isolation: Use nylon hardware and ensure standoffs do not touch exposed pads. Add an insulating sheet under the ESC if the frame is conductive.
- Capacitor: For 6S, a 35 V 470 to 1000 µF low ESR cap close to the ESC battery pads. For 4S, 25 V is typical. Short leads work best. This ₹50 part can save your ₹3000 ESC.
- Strain relief: Route and secure motor wires so they do not rub carbon edges. Do not overtighten gummies in the stack - let them breathe.
- First power up: Use a smoke stopper and check for abnormal heat within 30 seconds. If something gets hot enough to hurt your finger, disconnect immediately.
Setup Order That Saves Time
- Select DShot rate and enable bidirectional DShot.
- Check motor mapping and direction with props off.
- Set a sensible motor idle such as 4 to 6% or enable dynamic idle.
- Short hover, then a 10 to 15 second punch out. If motors or ESC run hot, reduce prop pitch or verify tune.
Common Mistakes to Avoid
- Choosing an ESC that is under rated for your props and battery.
- Using legacy SimonK or Oneshot only ESCs on a modern Betaflight build.
- Powering a high draw video transmitter from a weak 5 V pad instead of a regulated 9 V rail.
- Skipping the low ESR capacitor, then chasing reboots or video noise.
- Assuming all 8 or 10 pin harnesses share the same pinout. They do not. Verify before plugging in.
- Not checking motor temperature after prop changes (hot motors = unhappy ESC).
Buyer Checklist
- 4 in 1 ESC, 35 to 60 A per channel, 3 to 6S compatible.
- DShot300 or DShot600, plus bidirectional DShot for RPM filtering.
- 30.5 x 30.5 mm M3 mounting for 5 inch builds.
- 8 or 10 pin harness with clear pinout documentation.
- Pads for a low ESR capacitor. Add one if not included.
Final thought: Your ESC is the middleman between battery and motors. Cheap out here and everything suffers - flight performance, video quality, and eventually your wallet when it fails. Get something solid with headroom, add that capacitor, and triple-check your wiring. A good ESC should be boring - it just works, every flight, without drama.
Gimbals and Cameras: Expanding the Drone’s Eye

For aerial photography and videography, using a gimbal and camera setup is key to getting great and steady shots. Gimbals work as stable platforms. They keep the drone camera safe from the shakes and moves. This helps you take smooth, cinematic clips, even when it is windy or if you are moving quickly.
The type and features of your camera matter a lot. Whether you have an action camera or a built-in camera on a drone, these will affect your video shooting quality and experience. Important features include resolution, frame rate, and sensor size. Consider these when selecting a camera.
Also, advanced gimbals can provide tools like object tracking, smart flight modes, and live streaming. Spending money on a good gimbal and camera setup can really improve your work in aerial photography and videography.
Communication Systems: Transmitters and Receivers

30-Second Version
- Default for a first 5 inch build: a 2.4 GHz transmitter with a matching AFHDS 2A receiver using a serial protocol such as iBUS or SBUS. Aim for 6 to 10 channels. This combo just works and will not break the bank.
- Wiring: connect receiver 5 V, GND, and the signal wire to a free UART RX pad on the flight controller. Use the dedicated SBUS pad if the board provides one.
- Setup: bind first which means pair the transmitter and receiver. Then set Serial based receiver in firmware and choose the correct protocol such as iBUS or SBUS. Confirm stick movements in the Receiver tab, then set failsafe and the arm switch.
- Antenna placement: mount receiver antennas away from carbon and away from the video transmitter antenna. Keep antenna tips at 90 degrees, like a V or L - parallel antennas are basically asking for dropouts.
What the radio link does
The transmitter in your hands sends control signals to a receiver on the quad. The receiver outputs a serial data stream to the flight controller, which turns your stick movements into motor commands. Lose this link mid-flight and your quad becomes an expensive lawn dart, which is why failsafe matters. Set it up properly.
Receiver signal types
- PWM: one wire per channel. Works but many wires and more latency. Avoid on modern quads.
- PPM: one wire that sums channels. Simpler than PWM but older and slower.
- Serial protocols: iBUS and SBUS send all channels on one wire with lower latency. Prefer serial for Betaflight builds.
Choosing a system
- AFHDS 2A ecosystems: common and cost effective for beginners. Pair a 2.4 GHz transmitter with a compatible receiver that supports iBUS or SBUS. Good for park flying, practice, and general freestyle.
- Module bays and upgrades: some transmitters include a rear module bay for external RF modules such as ExpressLRS. Check if your radio has a module bay before planning an upgrade path and match the receiver accordingly.
- Telemetry: many receivers can send data back to the transmitter such as battery voltage and RSSI. Useful for alarms and for knowing when to land.
Wiring and power tips
- Power: most receivers want regulated 5 V. Do not connect a 5 V receiver directly to battery voltage.
- Ground: keep a single clean ground path for video such as camera to flight controller to video transmitter to reduce noise.
- UART choice: use a free RX pad for iBUS or a dedicated SBUS input if the board has an inverter.
- Telemetry enable: enable receiver telemetry only after the link is stable and stick channels work correctly.
Range reality check
- Park flying: about 500 m is plenty with basic 2.4 GHz in clear conditions.
- Racing: range is rarely the limit before a crash is.
- Freestyle: 1 to 2 km covers most spots with good antenna placement.
- Long range: a different setup and often a different radio link.
Most beginners worry about range but fly within the first 100 m. Focus on link reliability and failsafe first.
Setup order that saves time
- Bind the receiver to the transmitter. Label the model on the radio.
- In firmware set Receiver mode to Serial based and choose iBUS or SBUS to match your receiver.
- Set the channel map to match your radio layout. Verify roll, pitch, yaw, and throttle move in the correct directions.
- Assign the arm switch and set a failsafe action such as drop or land based on your build and local rules.
- Bench test with props off, then a short hover in an open area.
Common mistakes to avoid
- Mixing a transmitter and receiver from different ecosystems and expecting them to bind.
- Selecting the wrong receiver protocol in firmware after wiring iBUS or SBUS which leads to no stick response.
- Routing receiver antennas along carbon or next to the video transmitter antenna. Carbon blocks signal.
- Skipping the failsafe check which can lead to a flyaway on signal loss.
- Powering a 5 V receiver from battery voltage which will damage it.
Buyer checklist
- Transmitter and receiver in the same ecosystem such as AFHDS 2A.
- 6 to 10 channels with an easy to reach arm switch.
- Receiver with iBUS or SBUS output for a single wire serial link.
- Compatible power which is usually 5 V and a clear pinout diagram.
- Spare antennas or heat shrink to protect receiver leads.
- Simulator support: many transmitters can act as a USB joystick for PC simulators which is the cheapest way to practice.
Additional Accessories (Switches, Relays, etc.) for Advanced Control
Advanced drone kits may require additional accessories like switches, relays, connectors, and more for enhanced control. These components boost the functionality and customization of drones, catering to the specific needs of hobbyists and professionals alike. With a wide range of drone parts available, selecting the right accessories can meet intricate demands, ensuring precision in flight operations. Incorporating these advanced elements into a drone kit can elevate performance, offering extra control and capabilities for specialized tasks and applications.
Major Application Areas
Drone technology has revolutionized various industries with its diverse applications. As technology continues to evolve and become more accessible, we can expect to see further advancements in various sectors, enhancing efficiency, safety, and creativity across different fields.
Agriculture:
- Equipped with sensors and cameras.
- Monitor crop health, optimize irrigation, and spray pesticides.
- Increases productivity, reduces manual labor, and minimizes environmental impact.
Search and Rescue:
- Utilizes thermal imaging cameras.
- Covers large areas quickly in disaster-stricken zones.
- Locates missing persons or survivors, crucial for saving lives.
Construction:
- Used for site surveying, progress tracking, and safety inspections.
- Captures aerial images and creates 3D models.
- Helps in informed decision-making, improving efficiency, and ensuring safety compliance.
Entertainment:
- Used for light shows and aerial performances.
- Synchronized fleets of drones with LED lights create captivating displays.
- Popular at concerts, festivals, and celebrations.
Other Common Uses:
- Racing Drones for hobbyists.
- Video shooting for professionals.
- Border surveillance for defense purposes.
Conclusion
Diving into the world of drones reveals a fascinating array of components working together to create these airborne marvels. From the sturdy frame that holds everything in place to the intricate flight controller that acts as the brain, each part plays a crucial role in the drone's performance. The motors and propellers team up to generate lift and thrust, while the ESCs ensure smooth communication between the flight controller and motors.
Building or upgrading a drone requires careful consideration of each component's specifications and compatibility. The choice of frame material and size, motor KV rating, propeller dimensions, and ESC current capacity all have an impact on the drone's capabilities and flight characteristics. By understanding these essential drone parts, enthusiasts and professionals alike can make informed decisions to optimize their drones for specific applications, whether it's racing, aerial photography, or long-range flights.
Frequently Asked Questions
How do I choose the right battery for my drone?
Choosing the right battery for your drone is important. You need to think about compatibility, capacity (mAh), and discharge rate (C rating). Always check your drone's specifications. You can also look online to find compatible LiPo batteries. Make sure they have the right capacity and discharge rates for your flight time and power needs.
Can I upgrade my drone with third-party accessories?
Yes, many drones allow for upgrades with added accessories from other brands. However, it is important to make sure they will work well together before you buy or add anything. You should check what the manufacturer suggests or look at online forums and guides to confirm compatibility. This way, you can avoid any problems.
What is the importance of GPS modules in drones?
GPS modules are very important for drones. They help with navigation, accuracy, and stability. These modules give exact location information. Because of this, drones can have features like returning to their home point, following certain paths, and staying still in the air. This is even possible when the wind is strong.
How do transmitters and receivers affect drone range and control?
Transmitters and receivers are key parts of your drone system. They help with range and control. If you have a transmitter that can send signals far and a strong receiver, your connection will be reliable even at long distances. A good antenna setup can also reduce interference. This boosts signal strength and helps you maintain better control of your drone.
What are the must-have spare parts for drone enthusiasts?
For anyone who enjoys flying quadcopters, it's important to have some key spare parts close by. This helps you fix problems quickly and get back in the sky. Important spare parts are extra propellers, a spare battery, and new motors. Having these parts on hand can really help in case of small accidents or if something stops working.
Where can I find high-quality drone parts in India?
High-quality drone parts can be purchased in India from well-known online stores such as Evelta and others. You can browse through different product categories of drone components that are offered at affordable prices. Additionally, local hobby shops and specialized retailers might also provide a diverse selection of components to fulfill your building requirements.
Which drone parts are most likely to damage?
When it comes to drones, certain components are more susceptible to damage than others. Propellers are often the first to break, especially in the event of a crash or collision. Motors are another common point of failure due to wear and tear from frequent use. Additionally, landing gear can be damaged during rough landings or crashes.
To minimize the risk of damage to these critical parts, regular maintenance is essential. Checking for loose screws, ensuring propellers are securely attached, and inspecting wiring for any signs of wear can help prevent potential breakdowns. Flying cautiously, especially in challenging weather conditions or crowded areas, can also reduce the likelihood of accidents that could lead to component damage.