The Evelta ADXL345 breakout board utilizes the ADXL345 chip designed by Analog Devices is a 3-Axis, ±2 g/±4 g/±8 g/±16 g Digital Accelerometer. The ADXL345 is a small, thin, low power, 3-axis accelerometer with high resolution (13-bit) measurement at up to ±16g. Digital output data is formatted as 16-bit twos complement and is accessible through either a SPI (3- or 4-wire) or I2C digital interface.
The ADXL345 is well suited for mobile device applications. It measures the static acceleration of gravity in tilt-sensing applications, as well as dynamic acceleration resulting from motion or shock. Its high resolution (4 mg/LSB) enables measurement of inclination changes less than 1.0°.
Several special sensing functions are provided. Activity and inactivity sensing detect the presence or lack of motion and if the acceleration on any axis exceeds a user-set level. Tap sensing detects single and double taps. Free-fall sensing detects if the device is falling. These functions can be mapped to one of two interrupt output pins. An integrated, patent pending 32-level first in, first out (FIFO) buffer can be used to store data to minimize host processor intervention.
Low power modes enable intelligent motion-based power management with threshold sensing and active acceleration measurement at extremely low power dissipation.
The ADXL345 features 4 sensitivity ranges from +/- 2G to +/- 16G. And it supports output data rates ranging from 10Hz to 3200Hz.
Board Features- Single tap/double tap detection
- Activity/inactivity monitoring
- Free-fall detection
- Supply voltage : 3.3V/5V
- Ultralow power: as low as 23 µA in measurement mode and 0.1 µA in standby mode at VS = 2.5 V (typical)
- SPI (3- and 4-wire) and I2C digital interfaces
- Dimensions: 32.5 x 22 mm
1 x Arduino UNO R3 Clone4 x 1 Pin Jumper Wire (Male) - Pack of 101 x Breadboard - 830 Holes 54mm x 166mm
How MEMS WorksMEMS (micro-electromechanical system) - A MEMS (micro-electromechanical system) is a miniature machine that has both mechanical and electronic components. The sensor consists of a micro-machined structure on a silicon wafer. The structure is suspended by polysilicon springs which allow it to deflect when subject to acceleration in the X, Y and/or Z axis. Deflection causes a change in capacitance between fixed plates and plates attached to the suspended structure. This change in capacitance on each axis is converted to an output voltage proportional to the acceleration on that axis.

Front

Back
ADXL345 Breakout Board Pin FunctionGND - This pin must be connected to groundVIN - Supply VoltageCS - Chip Select
INT1 - Interrupt 1 Output
INT2 - Interrupt 2 Output
SDO - Serial Data Output (SPI 4-Wire) / I2C Address Select
SDA - Serial Data I2C / Serial Data Input (SPI 4-WIRE) / Serial Data Input and Output (SPI 3-Wire)
SCK - Serial Communications Clock
ADXL345 Arduino I2C ConnectionThe ADXL345 Breakout has an I2C address of 0x53. It can share the I2C bus with other I2C devices as long as each device has a unique address. Only 4 connections are required for I2C communication.
- GND->GND
- VIN->+5v
- SDA->SDA (Analog 4 on "Classic Arduinos")
- SCL->SCL (Analog 5 on "Classic Arduinos")
The Evelta breakout has level shifting and regulation circuitry so you can power it from 3-5V and use 3V or 5V logic levels for I2C.

Install the Library
Download the ADXL345 library and install it.
How to install library
To start, load the Arduino IDE. Then use the menus at the top to select Sketch -> Include Library -> Manage Libraries...

You will then get a list of all the great libraries you can install!
Most often you may use the Search features at the top to find a specific library.

Test the Code
Click "File->Examples->Adafruit_ADXL345->sensortest" to load the example sketch from the library.
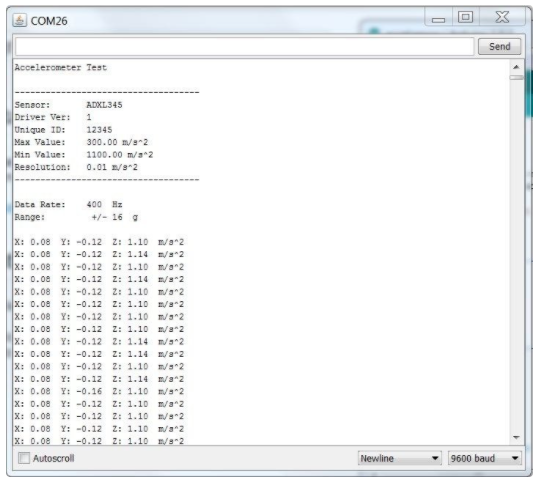
Then click on the compile/upload button to compile and upload the sketch to the Arduino. You should see output similar to below. Watch the values change as you move the board around.
Output